#VlogwithSony - 5 important settings for Vlogging
~ by Sony India
PUBLISH DATE: Oct. 5, 2020

Keeping up with the recent trends, Vlogging has become a new form of communication and engagement for bloggers, social media influencers, photography enthusiasts etc. Vlogging is a simple act of documenting an event or an experience or talking about a subject through a video or series of videos. Understanding the increasing love for vlogging, we have listed down five important camera settings for you to adapt. To make a good quality vlog, you must have utmost patience and knowledge of your camera settings.
1. Video and Photo Transfer
Videos and pictures are important elements in a vlog. Incorporating this essential feature in our vlogging camera, it allows you to transfer pictures, videos from your mobile phone through WiFi as well as NFC sharing in a single touch.
How to start-
Go to the Camera menu, then to the Network menu, then go to Page 1. After you reach page 1, select “Sent to Smartphone function”. After this select a picture and video which you want to transfer. Hit the “ok” button and the camera will show you the QR Code screen. Now in your mobile phone, go to the “Imaging edge app” then select QR Scanner and scan camera QR code and done. Selected pictures will start getting transferred.


2. Slow and Quick motion videos
Share an array of videos with your audience through this feature. It allows you to edit videos either in slow motion as well as in fast motion video format. Vloggers looking to curate innovative and interesting videos can use this feature to add an edge to your content.
How to start-
Go to the Menu, then go to the Camera menu 2, go to page 1, then go to the S&Q settings. Once you reach here, Select S&Q Frame rate, after which select Slow-motion for 100/120 FPS and to get a Fast Motion video, select 1/2/3 FPS… Hit Ok. Then come back to the camera Mode dial and select S&Q mode… now you are ready to roll.

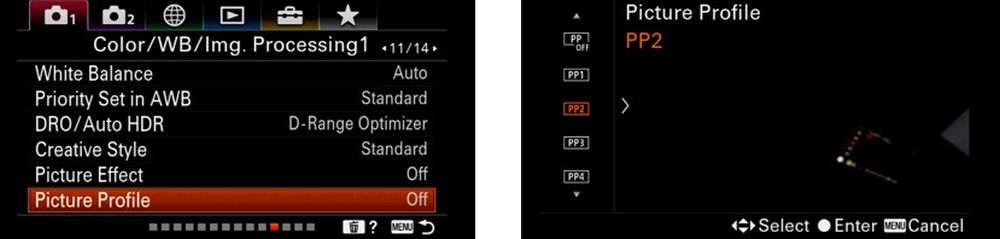
3. Picture Profiles & Picture effects
The picture profile feature allows you to create cine like videos. Equipped with the Picture profile format in Sony cameras, it allows vloggers to come up with multiple picture profile. This, in turn, will let you create more dramatic videos.
Steps for operating the Picture profiles feature
Go to the menu, then go to the Camera menu 1, then go Page 11. Once you reach page 11, go to Picture Profile, then select Picture Profile. In the camera, you will get 10 different Picture Profiles. You can select whatever you want. Meanwhile, the Picture Profile effect will enhance your vlogging experience. This feature in all Sony cameras comes with multiple default picture effects and can be freely used to build a creative look to photos and videos.
Steps for operating the Picture effect feature
Go to the menu, then go to the Camera menu 1, then you have to go to Page 11 and you will reach Picture effect. In the camera, you will get 9 Picture effects that change the video or photo colour look like – Toy Camera, Pop colour, posterization, selective colour, etc.
4. Custom Buttons
You need to be fully aware of this essential feature in your Sony cameras. It will allow you to add short cut camera settings on custom keys and you can customize camera according to your need.
How to Start-
Go to the Menu, then go to the camera menu 2, then head to Page 8, after which you will land at the “Custom Key”. These keys can be customized for video shooting and as well as for clicking pictures

5. Real-Time Tracking (Fast Auto Focus System)
Moving around a place and sharing the same through a video requires you to multi-task. Understanding the growing challenges faced by vloggers all over the world, we have equipped our Sony cameras with this feature. It allows creators to shoot video without missing their subjects. Real-time tracking is one of the advanced Autofocus technology fitted in our cameras. It uses an Artificial Intelligence algorithm to track the subject continually and also a response to Touch Tracking.
How to start
Step one: Go to the Menu, then go to the Camera Menu 2, then go to Page 9, head to the “Func of Touch Operation” and then set it on
Step Second: Go to the Menu, then head to the Suitcase Menu, then go to Page 3, select the “Touch Panel/Pad Option”
Step third: Go to the Menu, head to the Suitcase Menu, then go to Page 3, select “TouchPad Settings”, Select Touch Position mode “Absolute position” and Operation Area Select “Whole screen” and then press Ok.

Equipped with a basic knowledge of these features, we assure vloggers that if you keep these camera settings in mind, you will come out with a great vlog. Vlogging requires lots of patience but with the right set of information, you can go a long way into becoming a professional vlogger. Happy vlogging!

About Sony India
Welcome to the official Sony India page. Experience imagination made real through the people, places & products that give life to the Sony world.